
|

|
PLEASE NOTE: While the photos here are representative for this procedure, they may not be of the specific equipment you are repairing.
Important Disclaimer: This information is intended to assist you in repairing your keyboard, which is presumably no longer
under warranty. Doing this type of work will almost certainly void any existing warranty coverage. Syntaur offers this information as a free service,
and makes no warranties of any kind regarding its use. You are solely responsible for any damages, problems, or injuries resulting from opening up
and working on your equipment. Unless otherwise indicated, the keyboard should be powered off and unplugged while these procedures are being done; otherwise,
you can be exposed to potentially fatal voltages. If you do not feel comfortable or competent in performing these tasks, we strongly recommend taking your keyboard to a
service center. |
Calibrating an Arp Axxe Synthesizer
|
This procedure will walk you through the process of calibrating (tuning) an Arp Axxe synthesizer. The full calibration requires a voltmeter, a frequency counter or tuner, and an oscilloscope - however, you can get the synth playing perfectly in tune quite easily even if you only have an iPhone � simply download an app (such as Fine Tuner) which displays frequency measurements in Hz, skip the power supply calibration, and follow steps 2 through 5 for the Main Board.
This procedure requires working on the keyboard with the power on and the power supply exposed, so this calibration should not be attempted unless you are confident in your abilities to work safely, and to use the necessary equipment. Make sure the keyboard has been powered on for at least 15 minutes to warm up prior to any calibrations, and perform the calibration steps in the order they are listed here. (Click on any photo to enlarge it.) |
||||||||
|
POWER SUPPLY
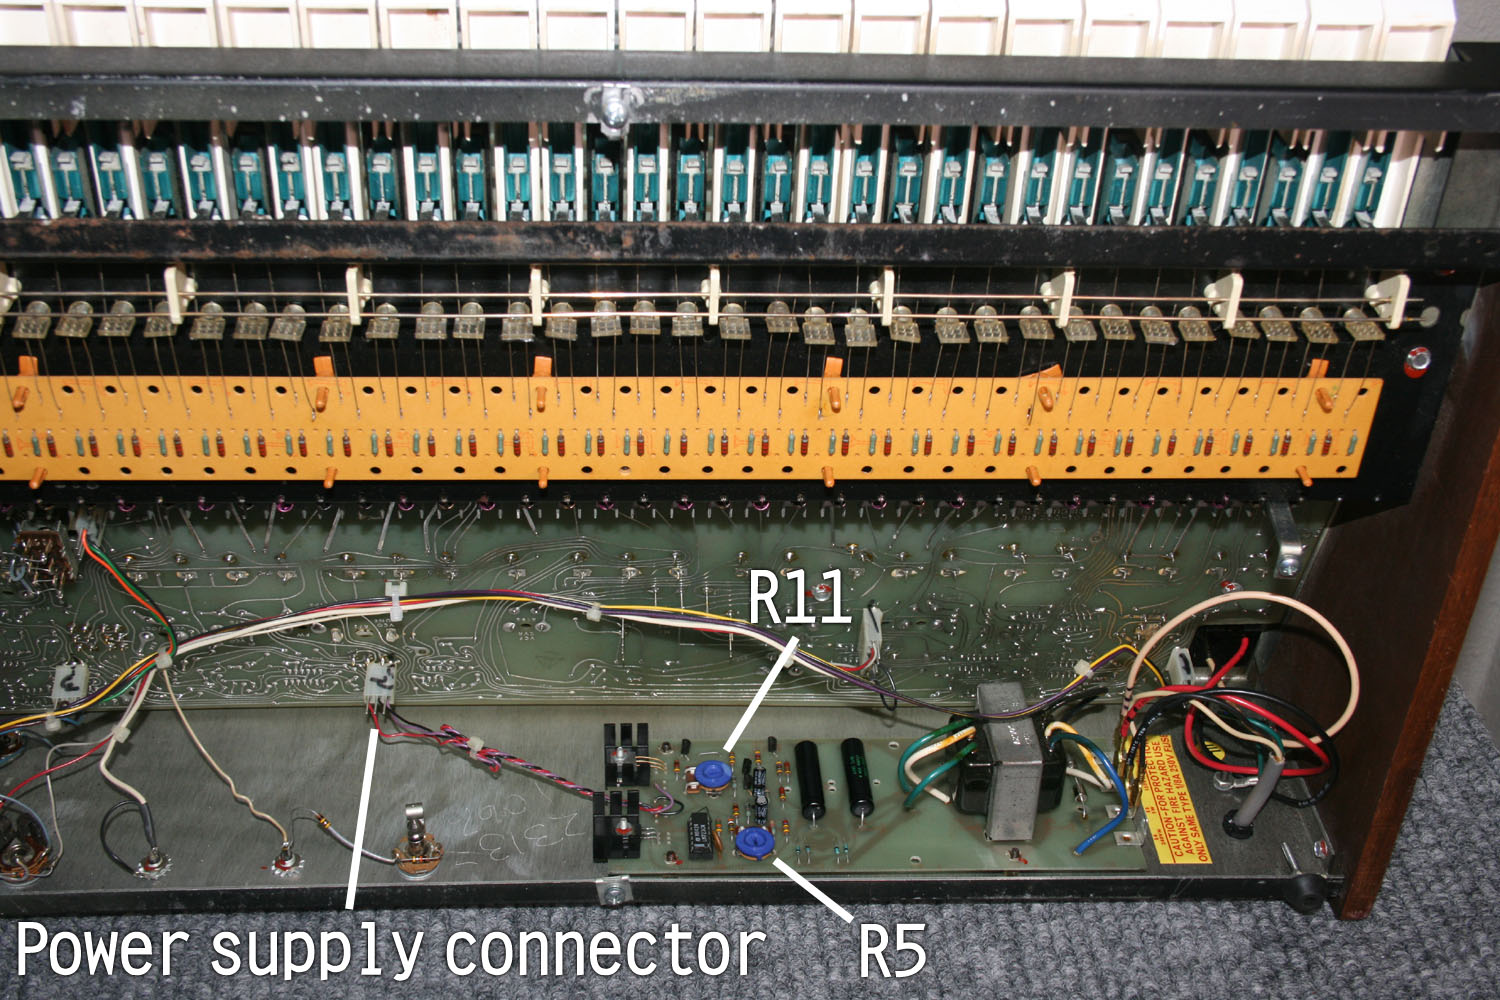
The power supply has one three-wire connector that plugs to the main board. It is easy to plug this in backwards, so first, use a Sharpie to mark the position of the connector before removing it. The purple wire goes onto the pin closest to the transformer. |
||||||||
|
|
|
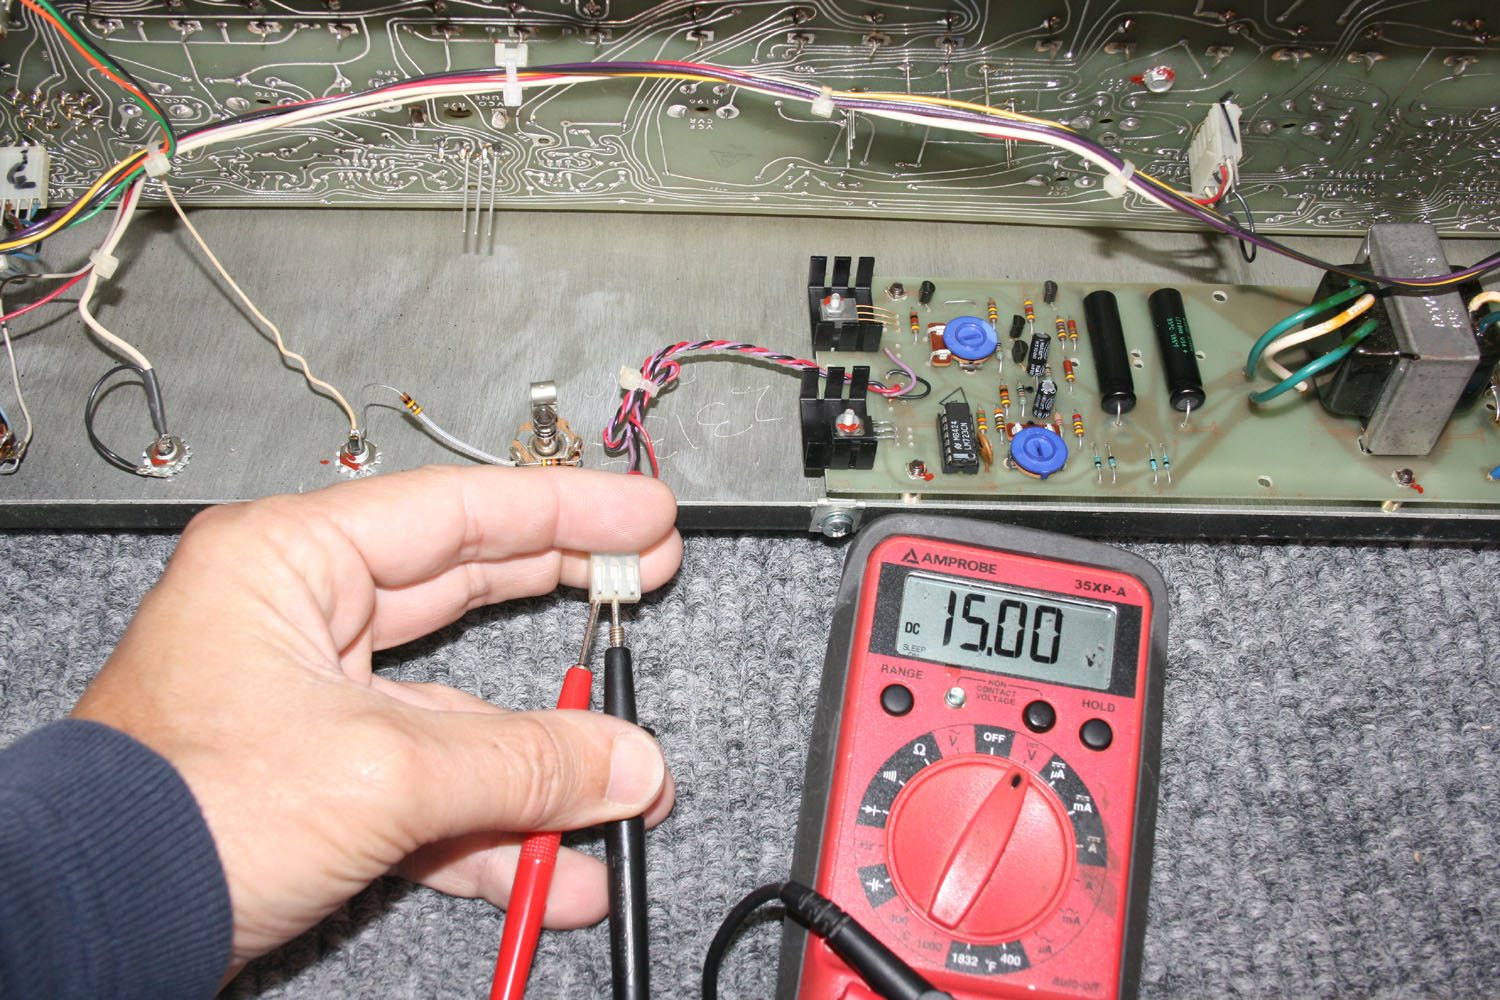
Unplug the power supply wiring harness, and measure the DC voltages by inserting your meter leads into the connector. The middle wire (black) is ground; measure between this and the other two wires.
|
|
|
|
Set the Pitch Bend control and Tune controls to the mid position, and set the Transpose switch to its middle position. Set the Noise Generator and Keyboard Repeat switches to Off. Set all sliders all the way down, except set both VCO sliders (square and sawtooth), VCF Freq, and ADSR Sustain fully up. Set the VCA ADSR slider to a comfortable listening level.
|
|
2. VCO Calibrate
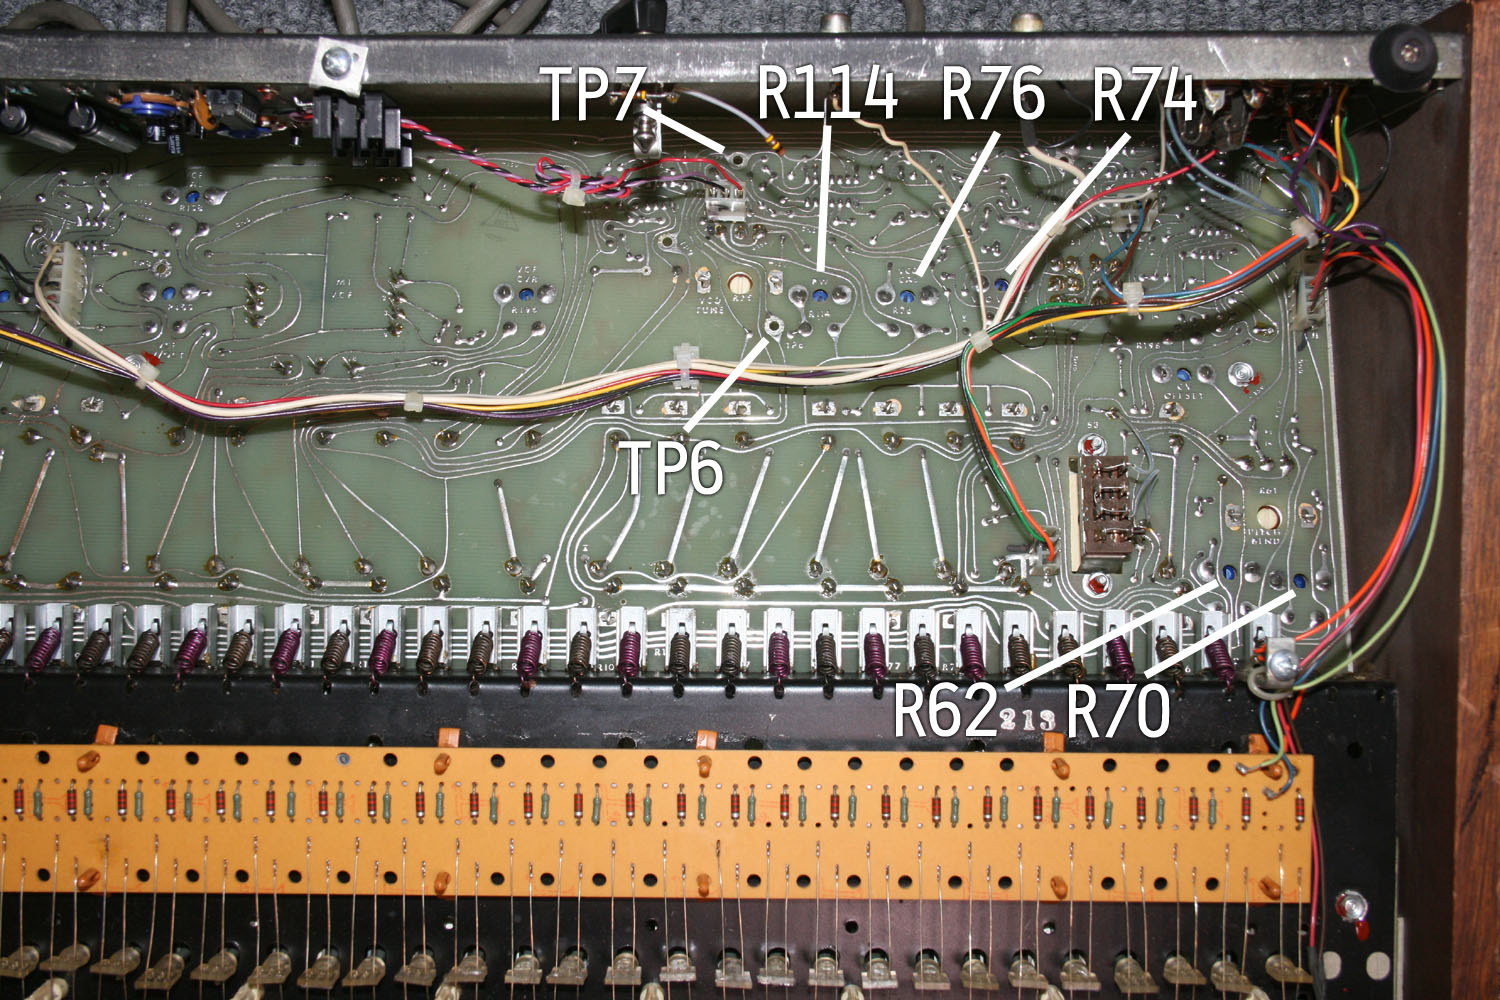
Measure the frequency at TP6. Play the lowest key, and adjust R76 (VCO CAL) for a frequency of 130 Hz.
3. VCO V/Oct
Play the highest note on the keyboard. With the frequency counter still at TP6, adjust R74 (VCO V/OCT) to get 1040 Hz.
Now play the lowest key again, and make sure it is at 130 Hz; if not, repeat steps 2 and 3 until the correct frequencies are obtained.
4. Transpose Calibrate
Switch the Transpose switch to the 2 OCTAVES UP position. Play the lowest key, and with the frequency counter still at TP6, adjust R62 (TRANSPOSE CAL) to get 520 Hz.
5. Pitch Bend Calibrate
Set the Transpose switch back to the middle position, and turn the Pitch Bend control fully clockwise (to its highest position). Play the lowest key, and with the frequency counter still at TP6, adjust R70 (PB CAL) to get 260 Hz.
|
|
Put all sliders fully down, and set the Pitch Bend control to its middle position. With an oscilloscope, monitor TP7, and observe the shape of the square wave. Adjust R114 (PW) for a 50% duty cycle (the upper and lower peaks of the wave should be identical in length).
|
|
7. VCA Control Reject
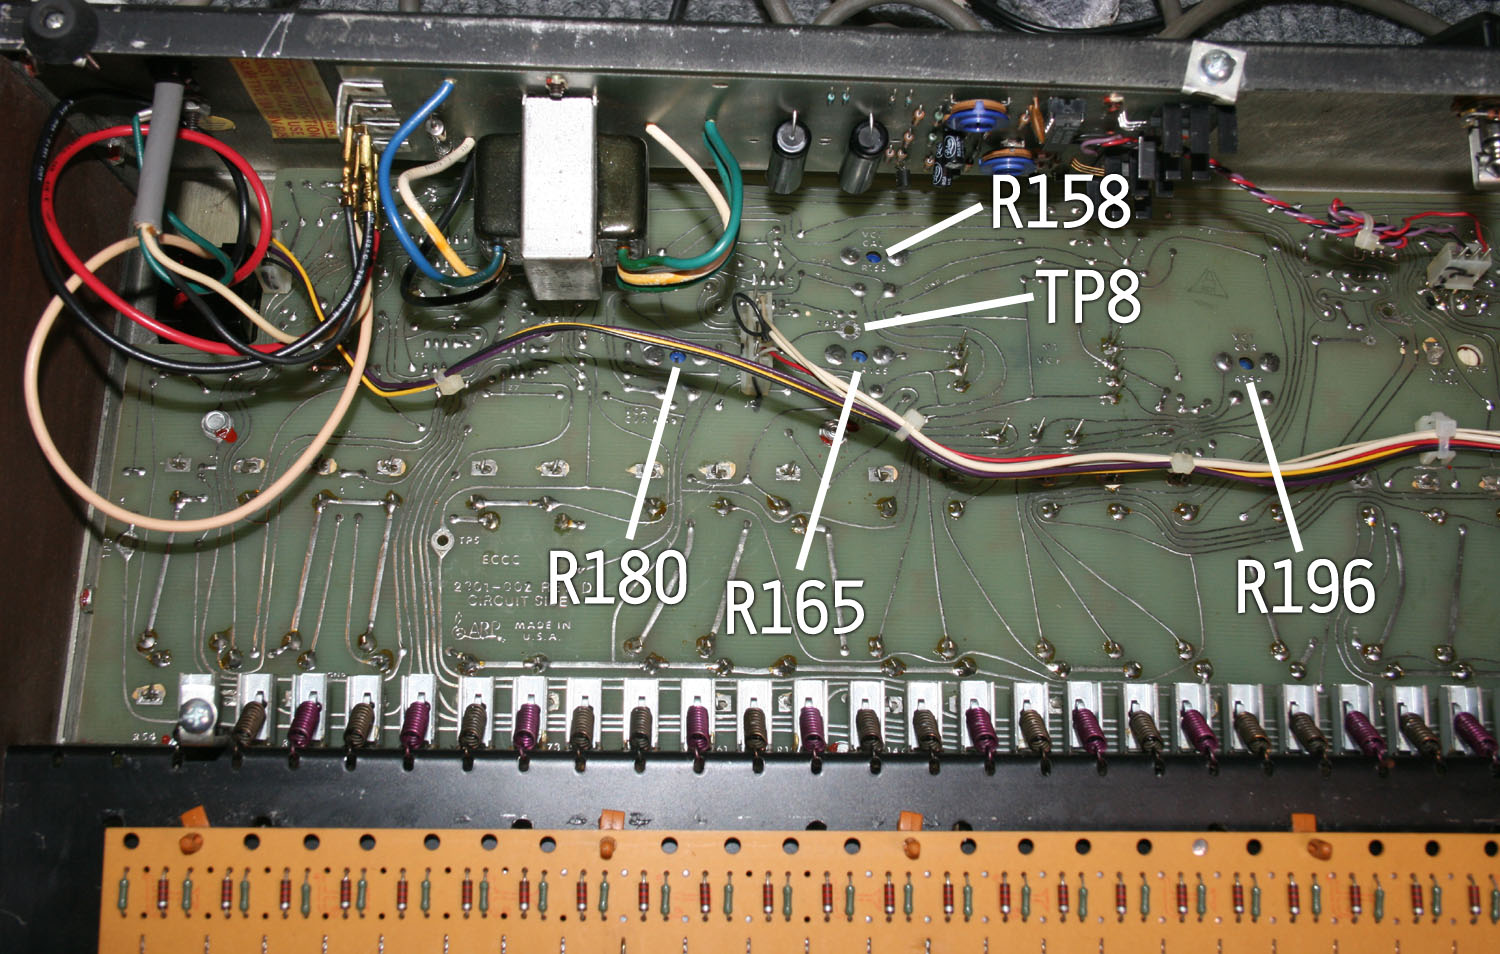
Move the LFO FREQ and VCA GAIN sliders fully upward, and set the KYBD REPEAT switch to AUTO REPEAT. With an oscilloscope monitoring the audio output, adjust R180 (VCA CVR) to get minimum amplitude of the output.
8. VCF Frequency Calibrate
Move all sliders fully down, except set VCF RESONANCE fully upward. With the frequency counter, measure TP8, and adjust R158 (VCF CAL) to get 16 Hz.
9. VCF CVR Reject
Set the VCF RESONANCE slider fully down, move the VCF LFO slider � of the way up, and the VCF ADSR slider fully up. With the AUTO REPEAT switch still on, use an oscilloscope to monitor TP8, and adjust R196 (VCF CVR) for minimum amplitude.
10. VCF V/Oct
Set the VCF RESONANCE and VCF KEYBOARD CV sliders fully up. Play the lowest note on the keyboard, and measure TP8 with a frequency counter; adjust the front panel VCF FREQ slider to get a reading of 130 Hz. Now play the highest note on the keyboard, and adjust R165 (VCF V/OCT) to get a reading of 1040 Hz.
|
|
|
The Axxe is now calibrated. The filter will should track perfectly with the keyboard. You can test this by moving the three AUDIO MIXER sliders all the way down, and setting the VCF resonance fully on - you should now hear a sine wave sound, and the VCF FREQ slider will control its pitch. With the VCF KYBD CV slider fully upward, the filter should play chromatically as you play the keys. |
|